Genius 10 Raised Garden Bed Layout Ideas That Maximize Space
Want more veggies, herbs, and flowers without expanding your yard? These clever raised bed layouts pack a ridiculous amount of growth into small footprints. They’re efficient, pretty, and totally doable—even if your tools are basically a trowel and a dream. Let’s turn that patch of dirt into a productivity machine.
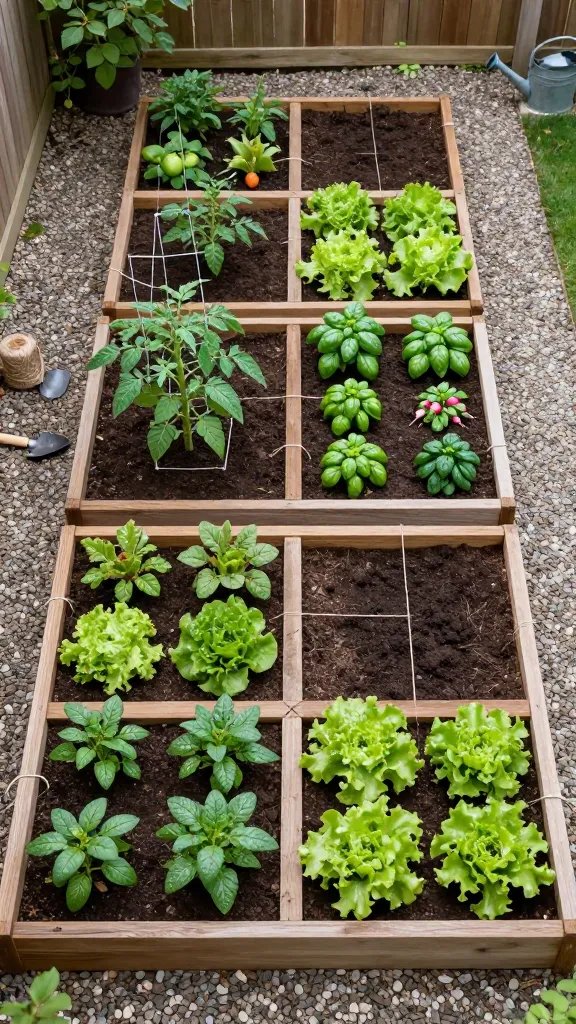
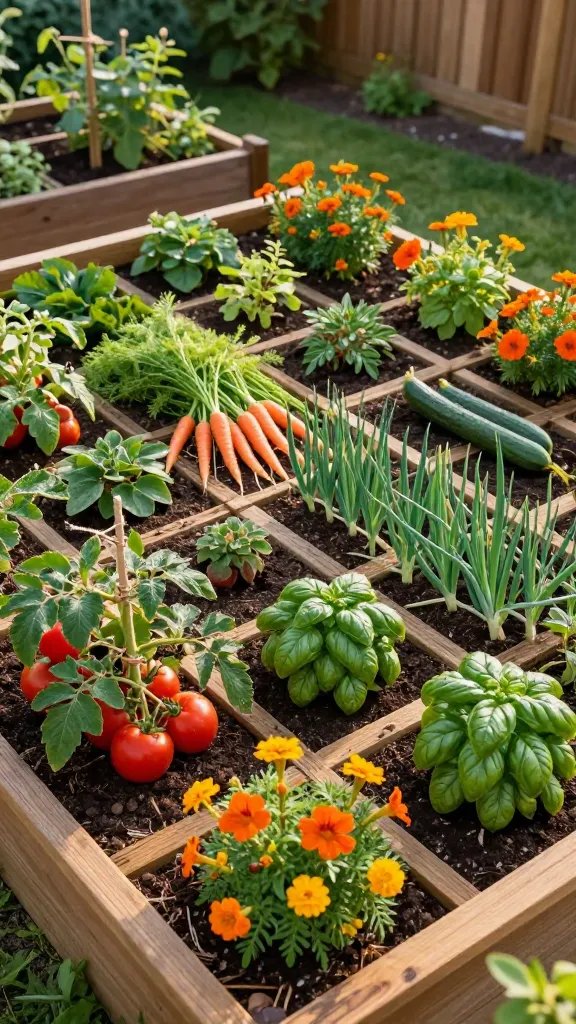
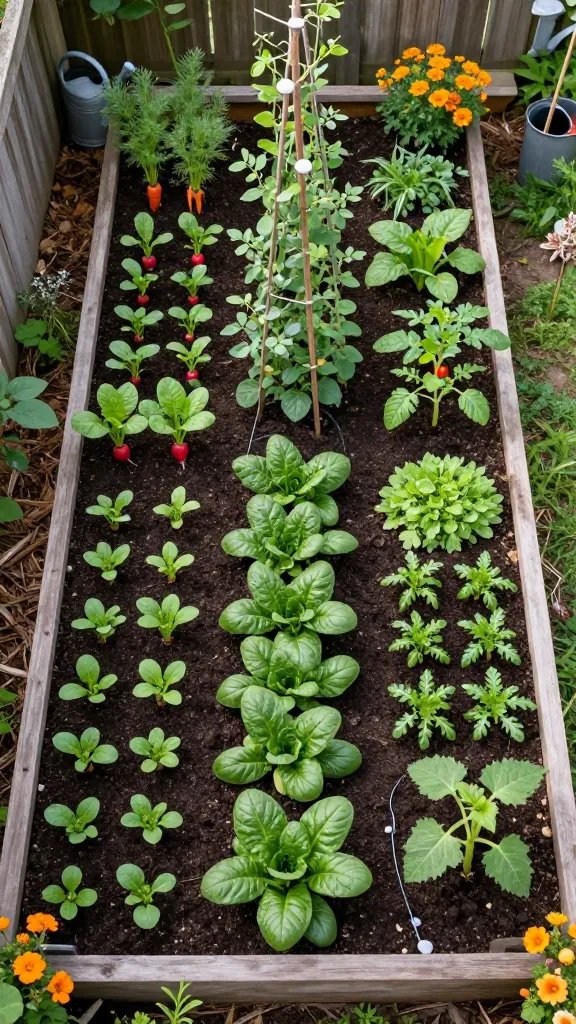
1. The Classic Grid: Square-Foot Gardening, Supercharged
Tired of snacking when you’re not even hungry? This reset helps you stop the loop and feel back in control.
A simple reset for moments when cravings take over. Easy to use, easy to repeat, and designed to help you feel satisfied instead of stuck.
The square-foot method divides each raised bed into 1-foot squares so every inch works hard. You’ll plant by density, which keeps weeds low and harvests high. It’s beginner-friendly and nearly foolproof.
How It Works
- Use string or thin wood slats to mark 1×1-foot grids.
- Plant heavier feeders like tomatoes in single squares and greens in tighter clusters.
- Rotate crops square by square each season to keep soil balanced.
FYI: This layout shines in small spaces and helps you plan exactly how many plants you need—no guesswork, no chaos.
2. The Keyhole Bed: Compost in the Middle, Abundance on the Edge

Shaped like a keyhole with a center “basket” for compost, this layout feeds your plants as you go. You drop kitchen scraps in the middle, water through it, and boom—nutrient tea for the whole bed.
Transform Your Home With 7,250+ Stunning Landscaping Designs—No Expensive Designers Needed!
- 🌿 Access 7,250+ stunning landscaping designs.
- 💰 Save thousands—no pro designer needed.
- 🏡 Plans for gardens, patios, walkways, and more.
- ✨ Simple, beginner-friendly DIY layouts.
- 🛠️ Customize any design to fit your yard.
Tips
- Build a circular or horseshoe bed with a small walkway into the center.
- Use a wire cylinder lined with cardboard as your compost basket.
- Plant heavy feeders (like squash) closest to the compost for extra boost.
Use this when you want a low-maintenance, water-wise bed with built-in fertility—perfect for hot climates and forgetful waterers (we’ve all been there).
3. The Vertical Wall: Trellis Everything You Can
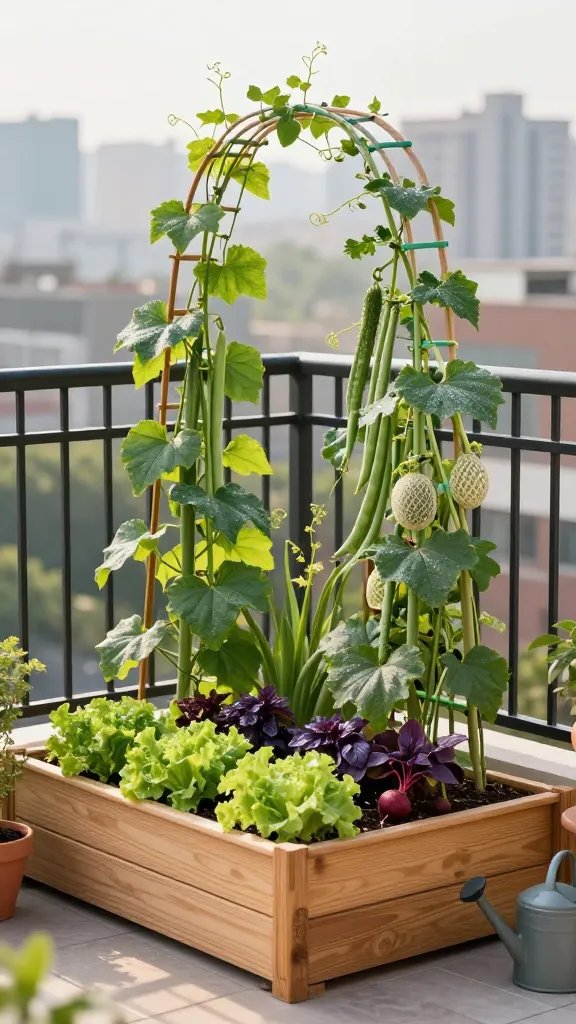
Think up, not out. A sturdy trellis behind or within your bed lets you grow cucumbers, beans, peas, and even small melons vertically, freeing ground space for lettuce, basil, and beets.
Materials
- Sturdy trellis: cattle panel, bamboo, or cedar lattice
- Soft plant ties or clips
- Mulch to keep lower crops happy
Great for balconies, small yards, or when you crave that lush, green, secret-garden vibe without sacrificing square footage. Seriously, vertical growing changes everything.
4. The U-Shape: Maximum Access, Minimal Aisles
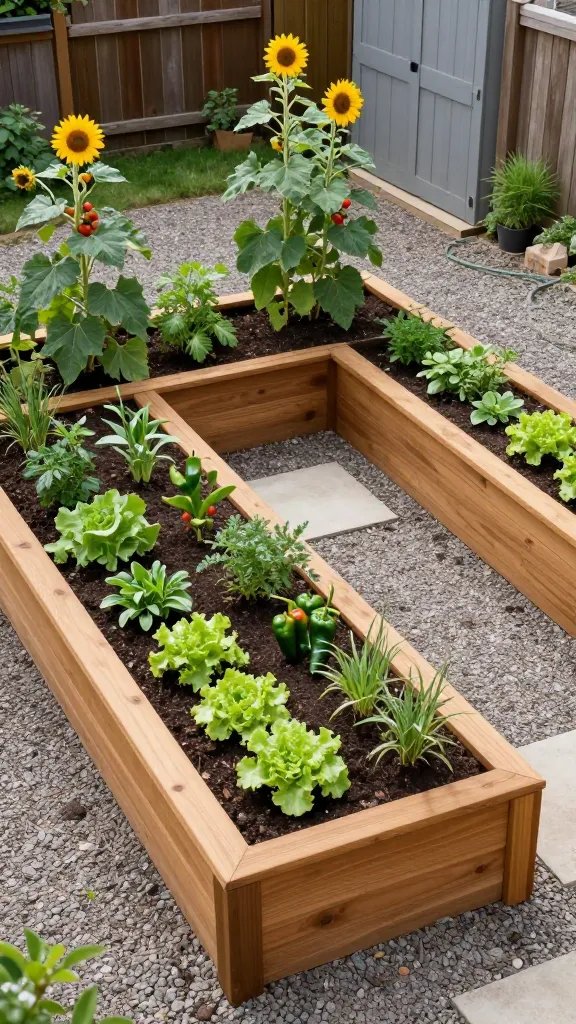
Make a big U-shaped bed and stand in the middle to reach everything without stepping on soil. You reduce paths and increase planting space—smart and ergonomic.
Design Notes
- Keep bed width to about 3–4 feet so you can reach the center.
- Place taller plants at the back and edges of the U.
- Add a paver or stepping stone in the center for stability.
Use this when you need accessibility, have a small space, or just hate awkwardly leaning across plants like a giraffe.
5. The Checkerboard Companion: Mix Friends, Block Pests
Interplant crops in a checkerboard pattern to confuse pests and optimize nutrients. Basil near tomatoes, onions near carrots, marigolds sprinkled throughout—classic combos that just work.
Winning Pairings
- Tomato + Basil: flavor boost, pest deterrence
- Carrot + Onion: masks each other’s scent
- Cucumber + Nasturtium: attracts pollinators, deters pests
Perfect for organic gardeners who want fewer sprays and more biodiversity. It looks gorgeous too—like a quilt you can eat.

6. The Tiered Terrace: Stairs, But Make It Plants

Stack beds at different heights to catch sun and save space. Lower tiers love shade from upper tiers, so you can tuck greens beneath taller summer crops.
Build Smart
- Use 6–12 inch height differences between tiers.
- Plant tall crops (tomatoes, okra) on the top tier, greens and herbs on the bottom.
- Install drip irrigation to avoid runoff chaos.
Best on sloped yards or when you want layers and drama. Bonus: tiering makes harvesting easier on your back, IMO.
7. The Wicking Bed Grid: Water Once, Relax More
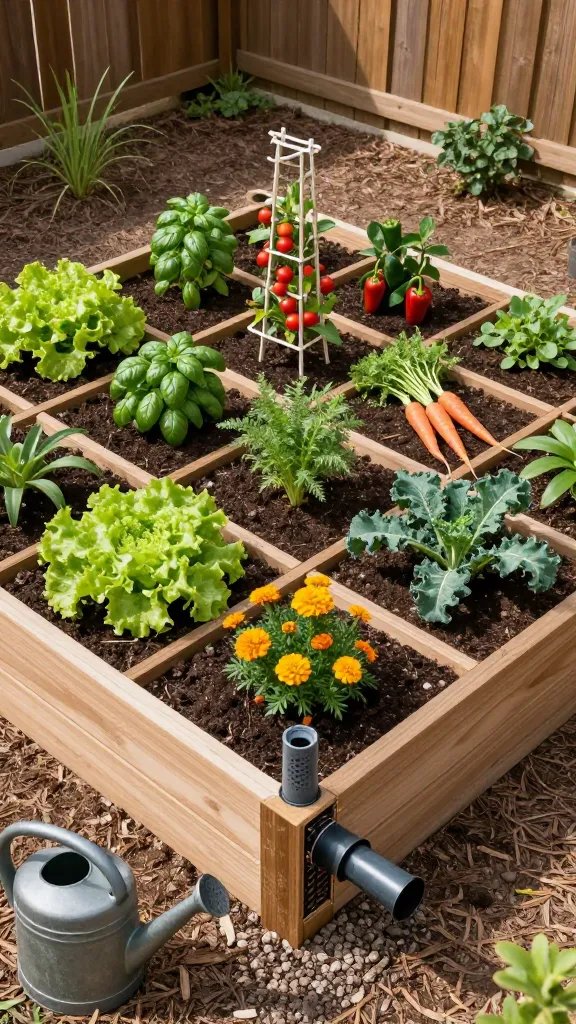
Wicking beds store water in a reservoir under the soil, so plants sip from below as needed. Add a simple grid up top, and you’ve got water-efficient square-foot gardening on autopilot.
Key Points
- Build a lined bed with a gravel or pipe reservoir and an overflow outlet.
- Top with high-quality soil and compost mix.
- Use a fill tube to top up water weekly (or less).
Ideal for hot, dry climates or busy gardeners. Your plants stay consistently hydrated, and you avoid that “oops, I forgot to water for three days” panic.
8. The Spiral Sun Map: Plant by Light, Not Guesswork
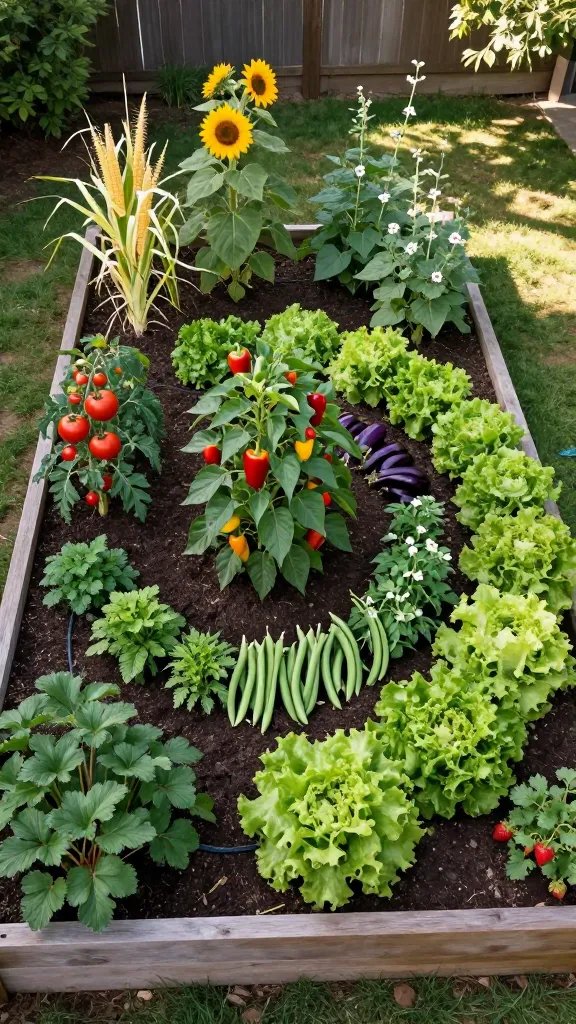
Arrange plants in a rough spiral or concentric pattern based on sunlight and height. Tall crops anchor the north side, mid-height in the middle, and shade-lovers curl around the edge.
Layout Basics
- North side: tomatoes, corn, sunflowers
- Center ring: peppers, eggplants, bush beans
- Outer ring: lettuce, cilantro, strawberries
Use this when your yard gets uneven light or shifting shadows. It turns sun patterns into a growth cheat code, trust me.
9. The Intercrop Highway: Fast-Growers Between Slow-Growers
Plant quick crops in the gaps while bigger plants get established. Radishes between carrots, spinach under tomatoes, arugula around peppers—you harvest in stages and keep the bed full.
Quick Wins
- Radishes (25–30 days) between slow carrots
- Spinach under trellised peas early spring
- Bok choy before summer squash sprawls
Great for maximizing yield and reducing bare soil. It feels like gardening Tetris, and yes, it’s as satisfying as it sounds.
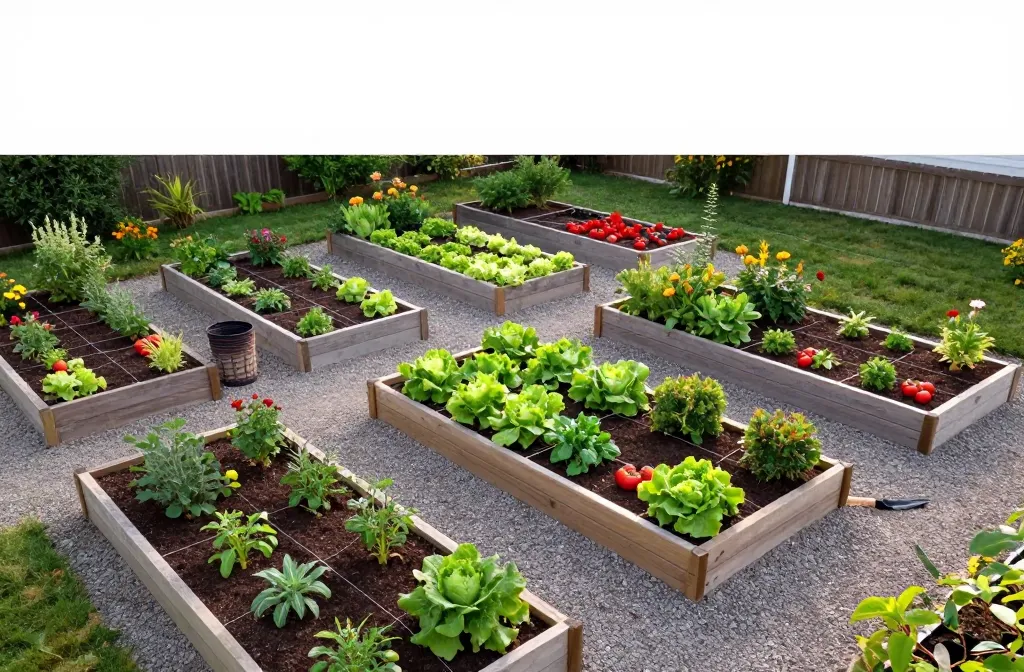
10. The Modular Mix-and-Match: Small Beds, Big Flexibility
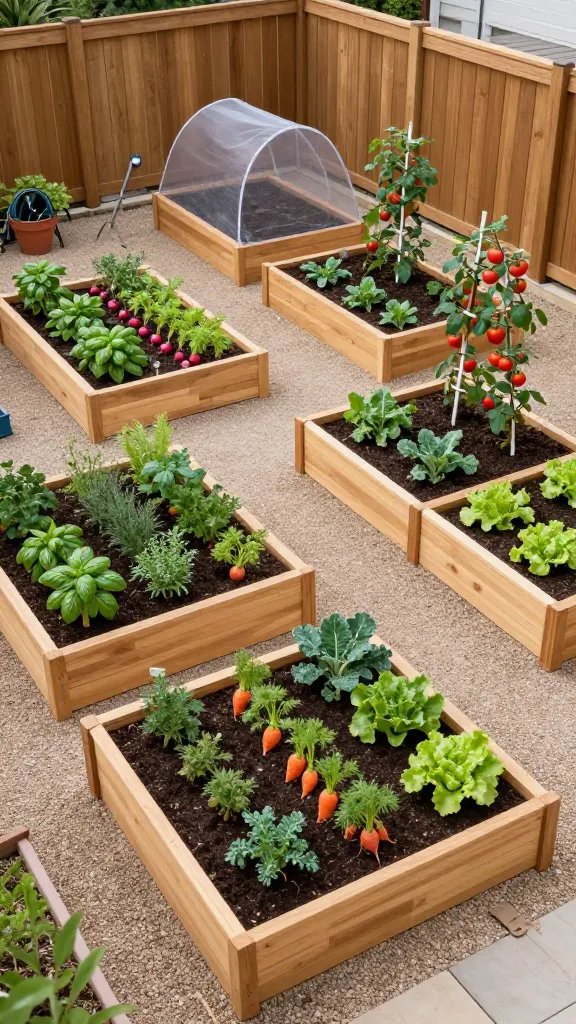
Use multiple small raised beds (2x4s or 3x3s) arranged like puzzle pieces. You’ll rotate crops easily, swap soil mixes for specialty plants, and reconfigure anytime.
Why It Works
- Dedicated beds for herbs, root crops, and heavy feeders
- Easy to net, cover, or trellis individual modules
- Fast repairs and upgrades without redoing everything
Use this when you crave flexibility or you’re renting. It scales beautifully from tiny patios to full-on backyard farms.
1. The Classic Grid: Square-Foot Gardening, Supercharged
The square-foot method divides each raised bed into 1-foot squares so every inch works hard. You’ll plant by density, which keeps weeds low and harvests high. It’s beginner-friendly and nearly foolproof.
How It Works
- Use string or thin wood slats to mark 1×1-foot grids.
- Plant heavier feeders like tomatoes in single squares and greens in tighter clusters.
- Rotate crops square by square each season to keep soil balanced.
FYI: This layout shines in small spaces and helps you plan exactly how many plants you need—no guesswork, no chaos.
2. The Keyhole Bed: Compost in the Middle, Abundance on the Edge
Shaped like a keyhole with a center “basket” for compost, this layout feeds your plants as you go. You drop kitchen scraps in the middle, water through it, and boom—nutrient tea for the whole bed.
Tips
- Build a circular or horseshoe bed with a small walkway into the center.
- Use a wire cylinder lined with cardboard as your compost basket.
- Plant heavy feeders (like squash) closest to the compost for extra boost.
Use this when you want a low-maintenance, water-wise bed with built-in fertility—perfect for hot climates and forgetful waterers (we’ve all been there).
3. The Vertical Wall: Trellis Everything You Can
Think up, not out. A sturdy trellis behind or within your bed lets you grow cucumbers, beans, peas, and even small melons vertically, freeing ground space for lettuce, basil, and beets.
Materials
- Sturdy trellis: cattle panel, bamboo, or cedar lattice
- Soft plant ties or clips
- Mulch to keep lower crops happy
Great for balconies, small yards, or when you crave that lush, green, secret-garden vibe without sacrificing square footage. Seriously, vertical growing changes everything.
4. The U-Shape: Maximum Access, Minimal Aisles
Make a big U-shaped bed and stand in the middle to reach everything without stepping on soil. You reduce paths and increase planting space—smart and ergonomic.
Design Notes
- Keep bed width to about 3–4 feet so you can reach the center.
- Place taller plants at the back and edges of the U.
- Add a paver or stepping stone in the center for stability.
Use this when you need accessibility, have a small space, or just hate awkwardly leaning across plants like a giraffe.
5. The Checkerboard Companion: Mix Friends, Block Pests
Interplant crops in a checkerboard pattern to confuse pests and optimize nutrients. Basil near tomatoes, onions near carrots, marigolds sprinkled throughout—classic combos that just work.
Winning Pairings
- Tomato + Basil: flavor boost, pest deterrence
- Carrot + Onion: masks each other’s scent
- Cucumber + Nasturtium: attracts pollinators, deters pests
Perfect for organic gardeners who want fewer sprays and more biodiversity. It looks gorgeous too—like a quilt you can eat.
6. The Tiered Terrace: Stairs, But Make It Plants
Stack beds at different heights to catch sun and save space. Lower tiers love shade from upper tiers, so you can tuck greens beneath taller summer crops.
Build Smart
- Use 6–12 inch height differences between tiers.
- Plant tall crops (tomatoes, okra) on the top tier, greens and herbs on the bottom.
- Install drip irrigation to avoid runoff chaos.
Best on sloped yards or when you want layers and drama. Bonus: tiering makes harvesting easier on your back, IMO.
7. The Wicking Bed Grid: Water Once, Relax More
Wicking beds store water in a reservoir under the soil, so plants sip from below as needed. Add a simple grid up top, and you’ve got water-efficient square-foot gardening on autopilot.
Key Points
- Build a lined bed with a gravel or pipe reservoir and an overflow outlet.
- Top with high-quality soil and compost mix.
- Use a fill tube to top up water weekly (or less).
Ideal for hot, dry climates or busy gardeners. Your plants stay consistently hydrated, and you avoid that “oops, I forgot to water for three days” panic.
8. The Spiral Sun Map: Plant by Light, Not Guesswork
Arrange plants in a rough spiral or concentric pattern based on sunlight and height. Tall crops anchor the north side, mid-height in the middle, and shade-lovers curl around the edge.
Layout Basics
- North side: tomatoes, corn, sunflowers
- Center ring: peppers, eggplants, bush beans
- Outer ring: lettuce, cilantro, strawberries
Use this when your yard gets uneven light or shifting shadows. It turns sun patterns into a growth cheat code, trust me.
9. The Intercrop Highway: Fast-Growers Between Slow-Growers
Plant quick crops in the gaps while bigger plants get established. Radishes between carrots, spinach under tomatoes, arugula around peppers—you harvest in stages and keep the bed full.
Quick Wins
- Radishes (25–30 days) between slow carrots
- Spinach under trellised peas early spring
- Bok choy before summer squash sprawls
Great for maximizing yield and reducing bare soil. It feels like gardening Tetris, and yes, it’s as satisfying as it sounds.
10. The Modular Mix-and-Match: Small Beds, Big Flexibility
Use multiple small raised beds (2x4s or 3x3s) arranged like puzzle pieces. You’ll rotate crops easily, swap soil mixes for specialty plants, and reconfigure anytime.
Why It Works
- Dedicated beds for herbs, root crops, and heavy feeders
- Easy to net, cover, or trellis individual modules
- Fast repairs and upgrades without redoing everything
Use this when you crave flexibility or you’re renting. It scales beautifully from tiny patios to full-on backyard farms.
Ready to get your hands dirty? Pick one layout, start small, and adjust as you grow—literally. Your future self (and your salad bowl) will thank you.